目次
踏み台にプロキシサーバ

踏み台の内側からyumを使用するためのHTTPプロキシ
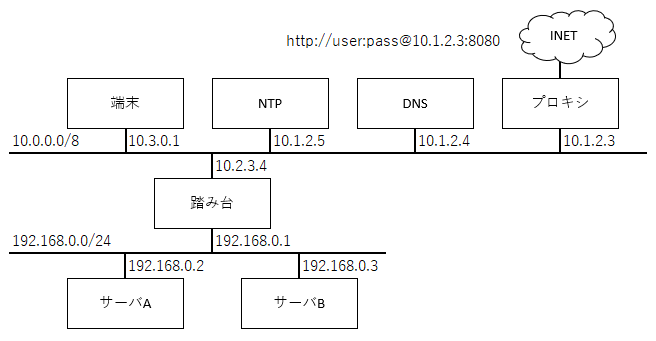
踏み台の内側からyumを使用するために、踏み台にプロキシを構築する。
踏み台
セキュリティを考えなければsquidのデフォルト設定だけで動作する。
設定ファイルは/etc/squid/squid.conf。デフォルトのポート番号は3128。
Rocky Linux 8/AlmaLinux 8の場合
squidのバージョンは4.15。
dnf install squid
systemctl enable squid --now
firewall-cmd --add-service=squid
firewall-cmd --runtime-to-permanent
CentOS 7の場合
squidのバージョンは3.5。
yum install squid
systemctl enable squid
systemctl start squid
firewall-cmd --add-service=squid
firewall-cmd --runtime-to-permanent
CentOS 6の場合
squidのバージョンは、パッケージ名がsquidなら3.1、squid34なら3.4。
- /etc/sysconfig/iptables
-A INPUT -m state --state NEW -m tcp -p tcp --dport 3128 -j ACCEPT
yum install squid34
service squid start
service iptables restart
内側
echo "proxy=http://192.168.0.1:3128" >> /etc/yum.conf
踏み台とインターネットの間にプロキシがある場合
squidのcache_peerを使用する。
プロキシがhttp://user:pass@10.1.2.3:8080の場合の例。
cache_peer 10.1.2.3 parent 8080 0 no-query default login=user:pass proxy-only
never_direct allow all
内側からの要求のみを受け付ける場合
踏み台を悪用されないようにアクセス制限をかける。
アクセス制御の部分のみ抜粋。
# 踏み台の内側
acl private src 192.168.0.0/24

# ローカルホストからの要求は許可
http_access allow localhost
# 踏み台内側からの要求は許可
http_access allow private
# それ以外の要求は拒否
http_access deny all
HTTPプロキシに外側から内側へのアクセスも許可する場合
- 内側から外側へのプロキシ
- 外側から先は別のプロキシへ転送
- 外側から内側へのプロキシ
- 外側から外側への要求は拒否する
外側の端末は、http://192.168.0.1:3128をプロキシに設定すれば踏み台の内側にアクセスできる。
- /etc/squid/squid.conf
# 宛先がno-proxyでなければ、外側のプロキシに要求を転送
cache_peer 10.1.2.3 parent 8080 0 no-query default login=user:pass proxy-only
acl no-proxy dst 10.0.0.0/8
acl no-proxy dst 172.16.0.0/12
acl no-proxy dst 192.168.0.0/16
acl no-proxy dst fc00::/7
always_direct allow no-proxy
never_direct allow all

# デフォルトの設定 ここから
acl SSL_ports port 443          # https
acl Safe_ports port 80          # http
acl Safe_ports port 21          # ftp
acl Safe_ports port 443         # https
acl Safe_ports port 70          # gopher
acl Safe_ports port 210         # wais
acl Safe_ports port 1025-65535  # unregistered ports
acl Safe_ports port 280         # http-mgmt
acl Safe_ports port 488         # gss-http
acl Safe_ports port 591         # filemaker
acl Safe_ports port 777         # multiling http
acl CONNECT method CONNECT

http_access deny !Safe_ports
http_access deny CONNECT !SSL_ports
http_access allow localhost manager
http_access deny manager
# デフォルトの設定 ここまで

# 踏み台の内側
acl from-private src 192.168.0.0/24
acl to-private dst 192.168.0.0/24

# ローカルホストからの要求は許可
http_access allow localhost
# 踏み台内側からの要求は許可
http_access allow from-private
# 踏み台外側から踏み台内側への要求は許可
http_access allow !from-private to-private

# それ以外、踏み台外側から踏み台外側、の要求は拒否
http_access deny all

# ホスト名を取得できないという警告が出るならここで設定
visible_hostname xxxx

# キャッシュを無効にしてプロキシ機能のみを使う
cache deny all
# 停止時の待ち時間を短く
shutdown_lifetime 1 seconds

# X-Forwarded-Forヘッダを編集しない
forwarded_for transparent

# デフォルトの設定 ここから
http_port 3128
coredump_dir /var/spool/squid
refresh_pattern ^ftp:           1440    20%     10080
refresh_pattern ^gopher:        1440    0%      1440
refresh_pattern -i (/cgi-bin/|\?) 0     0%      0
refresh_pattern .               0       20%     4320
# デフォルトの設定 ここまで
SSHでSOCKS5プロキシ
SSHを利用して簡単にSOCKS5のプロキシサーバを構築する。 SOCKSに対応したアプリなら内側から外側にも、外側から内側にも使用できる。
systemdを使用するCentOS7以降での設定方法。
公開鍵の登録
なるべくroot以外のユーザで、
SSH認証鍵を作成し、自分自身に公開鍵を登録する。
localhostは公開鍵の登録時と、次のユニットファイルでの指定とで合わせる。
$ ssh-keygen
$ ssh-copy-id localhost
ユニットファイルの作成
実行するユーザをuser、グループをgroupとした場合。
# vi /etc/systemd/system/socks-proxy.service
- /etc/systemd/system/socks-proxy.service
[Unit]
Description=SOCKS5 proxy server
After=network.target network-online.target
Requires=sshd.service

[Service]
Type=simple
ExecStart=/usr/bin/ssh -nTND :1080 -o BatchMode=yes localhost
User=user
Group=group
SELinuxContext=system_u:system_r:ssh_t:s0
Restart=always

[Install]
WantedBy=multi-user.target
# chmod 664 /etc/systemd/system/socks-proxy.service
# chown root:root /etc/systemd/system/socks-proxy.service
SELinuxのポリシーモジュールを作成
ポリシーモジュールsocks-proxy.ppを作成する。
別の環境で作成可能。
systemdのinit_tドメインから、sshのssh_tドメインへの遷移を許可する。 ドメイン遷移はルールによる暗黙的な遷移ではなくsystemdのユニットファイルで明示的に行うものとする。
またssh_tドメインがsocks_port_tのポートを使用できるようにする。
ポリシーモジュールでは1080/tcpをsocks_port_tに割り付けられないため、
別途semanage portコマンドを使用して割り付ける。
- socks-proxy.te
module socks-proxy 1.0;

require {
  role system_r;
  type init_t;
  type ssh_t;
  type ssh_exec_t;
  type socks_port_t;
  class file { execute open read };
  class process transition;
  class tcp_socket name_bind;
}

role system_r types ssh_t;
allow init_t ssh_t:process transition;
allow init_t ssh_exec_t:file { execute open read };
allow ssh_t socks_port_t:tcp_socket name_bind;
$ sudo dnf install policycoreutils-devel
$ make -f /usr/share/selinux/devel/Makefile socks-proxy.pp
SELinuxのポリシーモジュールをインストールし、ポートにラベルを付与する
# semodule -i socks-proxy.pp
# semanage port -a -t socks_port_t -p tcp 1080
サービスの開始とポートの開放
# systemctl daemon-reload
# systemctl start socks-proxy
# systemctl enable socks-proxy
# firewall-cmd --add-port 1080/tcp
# firewall-cmd --runtime-to-permanent
クライアントの設定
curl
curl -x socks5h://10.2.3.4:1080 <URL>
プロトコルにsocks5hを使用するとプロキシサーバに名前解決を依頼する。
例えば踏み台の内側で独自にDNSサーバを建ててプライベートなドメインを構築している場合、
socks5hを使用すると踏み台の外側から内側のホスト名でURLを指定できる。
プロキシサーバでの名前解決が不要な場合はプロトコルにsocks5を使用する。
TeraTerm
新しい接続でホストを以下のように指定する。
-proxy=socks5://10.2.3.4:1080 <user>@<host>
名前解決はプロキシサーバに依頼。
WinSCP
サイトの設定で、接続-プロキシを開く。
プロキシの形式でSOCKS5を選択し、プロキシホスト名とポート番号を入力する。
名前解決はプロキシサーバに依頼。
FireFox
プロキシの設定で、SOCKSホストに設定する。
またSOCKS v5を選択し、必要ならSOCKS v5を使用するときはDNSもプロキシーを使用するも選択する。