目次
複数のQEMU/KVMホストにまたがる仮想ネットワークをVXLANで構築
目的: 複数のホストにまたがる仮想ネットワークを構築し、それぞれのホストで動くVMが相互に通信できるようにする。
- libvirtが作成するデフォルト仮想ネットワークのブリッジ
virbr0はlibvirtが管理しているため、それとは別に手動でブリッジを作成する。 - 作成したブリッジをVXLANで相互に接続する。
- それぞれのホストでブリッジから仮想ネットワークを作成する。
- ブリッジ接続の仮想ネットワークはNATやDHCPサーバが自動的に構成されないので手動で追加する。
参考:
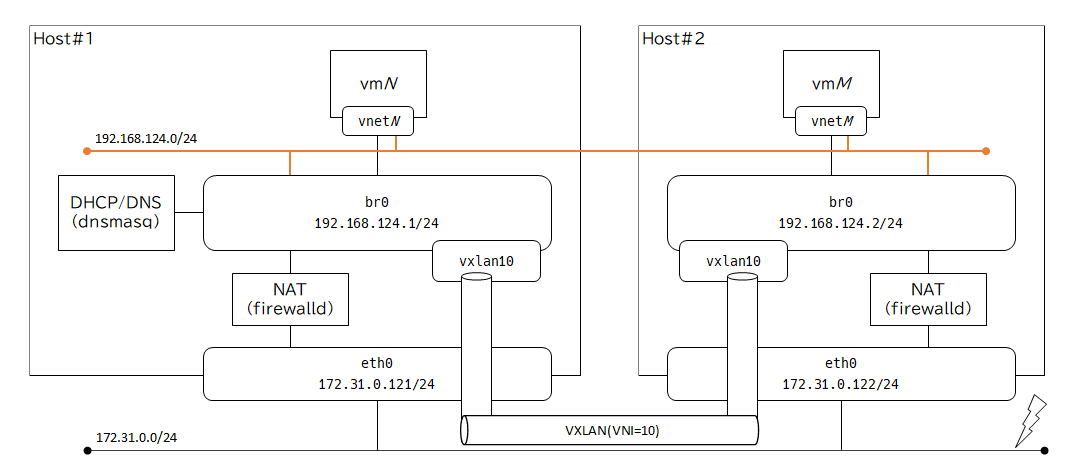
構成1 ホスト2台をユニキャストのVXLANで接続

- ホストはCentOS 7.9/Rocky Linux 8.7で172.31.0.121(eth0)と172.31.0.122(eth0)の2台
- DHCP/DNSサーバはHost#1で実行
- NAT/ゲートウェイはHost#1、Host#2それぞれで作成、DHCPで公告するのはHost#1のbr0
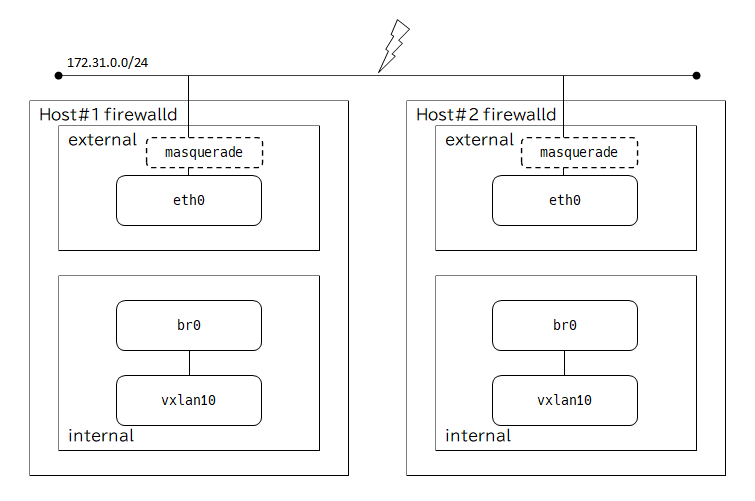
eth0はmasqueradeでNATを構成するためにexternalゾーンに移動- 仮想ネットワーク関連はfirewalldの
internalゾーンに作成する - 仮想ネットワーク(
br0)を作成する - VXLANの接続先(
remote)は対向のユニキャストアドレスを指定する

(構成1) カーネルパラメータの設定
libvirtがインストールされているならip_forwardの設定は不要なはず。
echo "net.ipv4.ip_forward = 1" > /etc/sysctl.d/ip_forward
echo 1 > /proc/sys/net/ipv4/ip_forward
(構成1) firewalldの設定
まずはexternalゾーンをpublicゾーンと同等の設定にし、
VXLANを許可してからeth0をpublicからexternalに移す。
firewall-cmd --zone=external --add-service=dhcpv6-client
firewall-cmd --zone=external --add-port 4789/udp
firewall-cmd --set-default-zone=external
firewall-cmd --runtime-to-permanent
nmcli con mod eth0 connection.zone external
Host#1のinternalゾーンはDHCPとDNSを許可する。
firewall-cmd --zone=internal --add-service dhcp
firewall-cmd --zone=internal --add-service dhcpv6
firewall-cmd --zone=internal --add-service dns
firewall-cmd --runtime-to-permanent
設定の確認。
firewall-cmd --get-default-zone
firewall-cmd --get-active-zones
firewall-cmd --list-all-zones
(構成1) ブリッジの作成とVXLAN接続
internalゾーンにブリッジbr0とVXLANで接続するvxlan10を作成する。
CentOS 7では、ipv6.method disabledをipv6.method ignoreにすること。
Host#1 172.31.0.121
nmcli con add type bridge con-name br0 ifname br0 ipv4.method static ip4 192.168.124.1/24 ipv6.method disabled connection.zone internal
nmcli con up br0
nmcli con add type vxlan slave-type bridge master br0 con-name br0-vxlan ifname vxlan10 id 10 remote 192.168.10.122 destination-port 4789 connection.zone internal
nmcli con up br0-vxlan
Host#2 172.31.0.122
nmcli con add type bridge con-name br0 ifname br0 ipv4.method static ip4 192.168.124.2/24 ipv6.method disabled connection.zone internal
nmcli con up br0
nmcli con add type vxlan slave-type bridge master br0 con-name br0-vxlan ifname vxlan10 id 10 remote 192.168.10.121 destination-port 4789 connection.zone internal
nmcli con up br0-vxlan
設定の確認
PAGER= nmcli
ip link
bridge fdb
firewall-cmd --get-active-zone
(構成1) 仮想ネットワークの作成
br0を使用する仮想ネットワークbr0-vxlanを作成。
cat <<EOF > /tmp/network-br0-vxlan.xml
<network>
  <name>br0-vxlan</name>
  <forward mode='bridge' />
  <bridge name="br0" />
</network>
EOF

virsh net-define /tmp/network-br0-vxlan.xml
virsh net-autostart br0-vxlan
virsh net-start br0-vxlan
不要なファイルの削除と状態確認。
rm /tmp/network-br{0,1}-vxlan.xml
virsh net-list
(構成1) DNS/DHCPサーバの設定 - Host#1
Rocky Linux 8の場合、必要なパッケージはlibvirtの依存関係でインストール済み。
CentOS 7の場合は追加でパッケージのインストールが必要。
yum install policycoreutils-python
br0で動くdnsmasqのサービスを作成する。
semanage fcontext --add -t dnsmasq_lease_t '/var/lib/dnsmasq-vxlan/dhcp\.leasefile'
semanage fcontext --add -t dnsmasq_etc_t '/var/lib/dnsmasq-vxlan(/.*)?'
mkdir /var/lib/dnsmasq-vxlan

cat <<EOF > /var/lib/dnsmasq-vxlan/dnsmasq.conf
strict-order
pid-file=/var/run/dnsmasq-vxlan.pid
except-interface=lo
bind-dynamic
interface=br0
dhcp-range=192.168.124.16,192.168.124.254
dhcp-no-override
dhcp-authoritative
dhcp-lease-max=253
dhcp-leasefile=/var/lib/dnsmasq-vxlan/dhcp.leasefile
dhcp-hostsfile=/var/lib/dnsmasq-vxlan/dhcp.hostsfile
dhcp-optsfile=/var/lib/dnsmasq-vxlan/dhcp.optsfile
addn-hosts=/var/lib/dnsmasq-vxlan/addn.hosts
EOF

touch /var/lib/dnsmasq-vxlan/dhcp.leasefile
touch /var/lib/dnsmasq-vxlan/dhcp.hostsfile
touch /var/lib/dnsmasq-vxlan/addn.hosts
touch /var/lib/dnsmasq-vxlan/dhcp.optsfile

restorecon -rv /var/lib/dnsmasq-vxlan

cat <<EOF > /etc/systemd/system/dnsmasq-vxlan.service
[Unit]
Description=DNS caching server for vxlan.
After=network.target

[Service]
ExecStart=/usr/sbin/dnsmasq -k --conf-file=/var/lib/dnsmasq-vxlan/dnsmasq.conf

[Install]
WantedBy=multi-user.target
EOF

systemctl enable dnsmasq-vxlan --now
systemctl status dnsmasq-vxlan
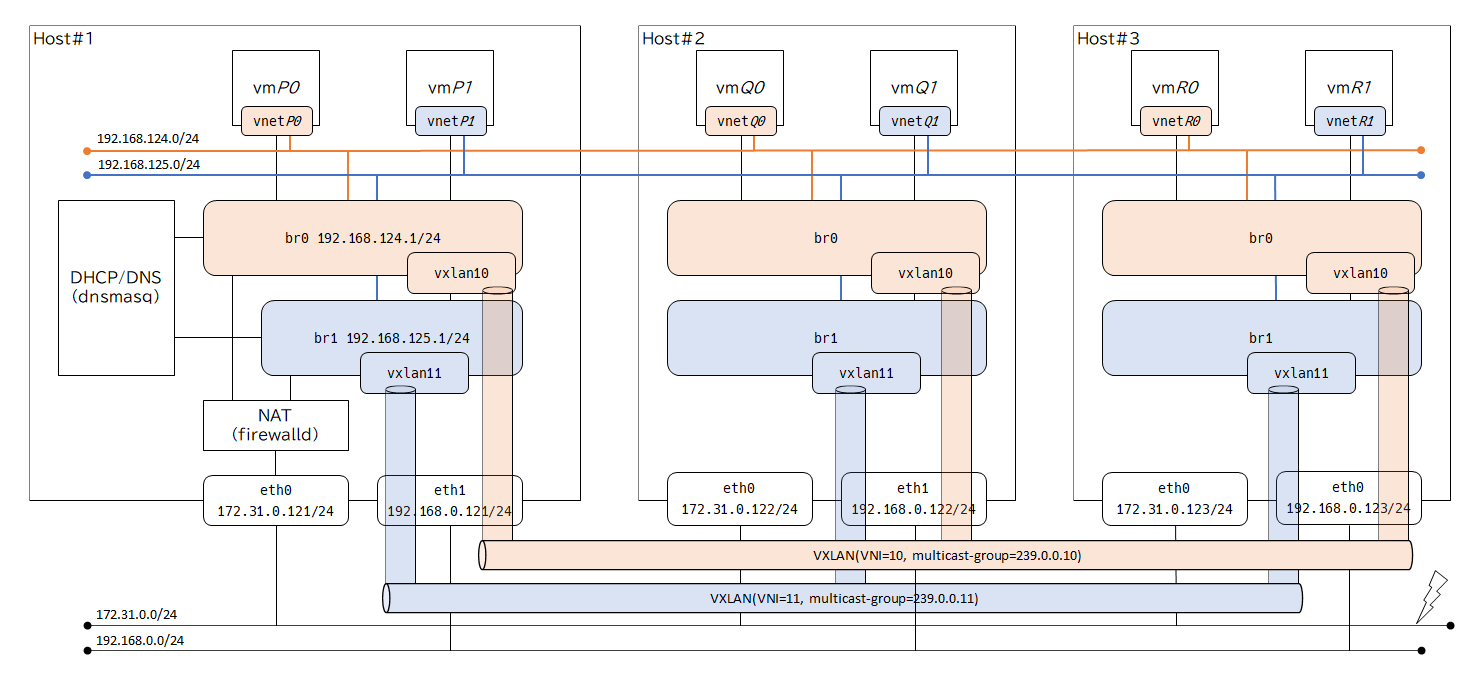
構成2 ホスト3台をマルチキャストでVXLAN接続

- NAT/ゲートウェイはHost#1経由
- DHCP/DNSサーバをHost#1で実行
- 仮想ネットワークを2つ(
br0とbr1)作成 - 外部向けと内部向け(VXLAN)のネットワークを分ける
- VXLANの接続先(
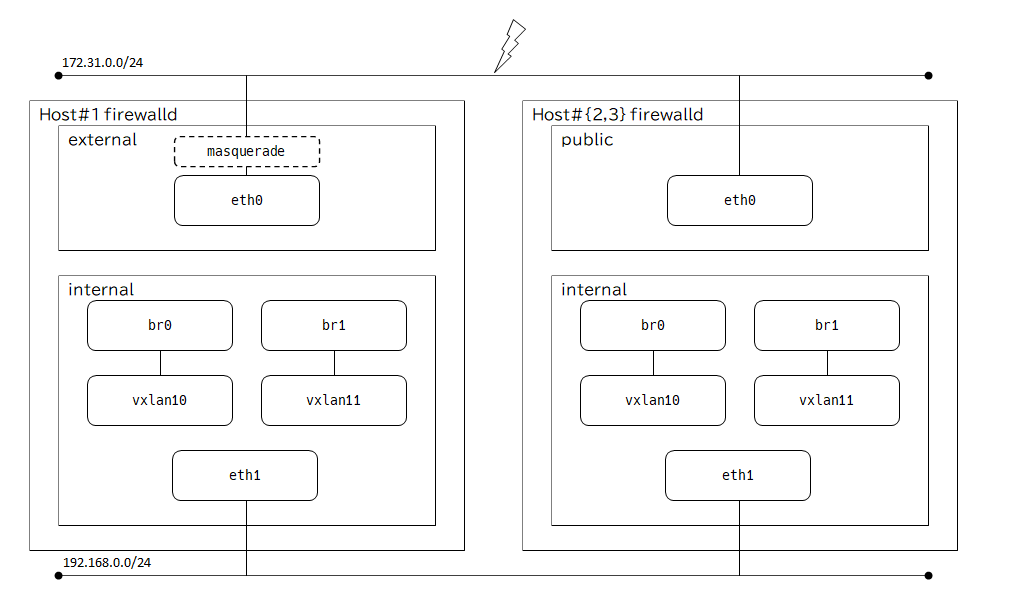
remote)にマルチキャストアドレスを指定 - VMとVXLAN関連の通信は全て
internalゾーンに移す

(構成2) NATの設定 - Host#1
externalゾーンをpublicゾーンと同等の設定にし、
eth0をpublicからexternalに移す。
firewall-cmd --zone=external --add-service=dhcpv6-client
firewall-cmd --set-default-zone=external
firewall-cmd --runtime-to-permanent
nmcli con mod eth0 connection.zone external
設定の確認。
firewall-cmd --get-default-zone
firewall-cmd --get-active-zones
firewall-cmd --list-all-zones
(構成2) ブリッジの作成とVXLAN接続
VMとVXLAN関連の通信は全てinternalゾーンに移す。
firewall-cmd --zone=internal--add-port 4789/udp
firewall-cmd --runtime-to-permanent
nmcli con mod eth1 connection.zone internal
CentOS 7では、ipv6.method disabledをipv6.method ignoreにすること。
br0とvxlan10の作成。
nmcli con add type bridge con-name br0 ifname br0 ipv4.method disabled ipv6.method disabled connection.zone internal
nmcli con up br0
nmcli con add type vxlan slave-type bridge master br0 con-name br0-vxlan ifname vxlan10 id 10 remote 239.0.0.10 dev eth1 destination-port 4789 connection.zone internal
nmcli con up br0-vxlan
br1とvxlan11の作成。
nmcli con add type bridge con-name br1 ifname br1 ipv4.method disabled ipv6.method disabled connection.zone internal
nmcli con up br1
nmcli con add type vxlan slave-type bridge master br1 con-name br1-vxlan ifname vxlan11 id 11 remote 239.0.0.11 dev eth1 destination-port 4789 connection.zone internal
nmcli con up br1-vxlan
今後ともL2でループが発生しないならば、STPを停止して負荷を下げることも可能。
nmcli con mod br0 bridge.stp no
nmcli con up br0
設定の確認。
PAGER= nmcli
ip link
bridge fdb
firewall-cmd --get-active-zone
注意: MTUの確認
ホスト上のip linkでMTUを確認すること。
マルチキャストを使用すると、br0のMTUが1450になる。
eth1: mtu 1500
br0: mtu 1450
vxlan10: mtu 1450
ユニキャストなら1500のまま。
eth1: mtu 1500
br0: mtu 1500
vxlan10: mtu 1500
マルチキャストを使用する場合は特に、 作成したVMでネットワークデバイスのMTUを確認しホストに合わせること。
nmcli con mod eth0 802-3-ethernet.mtu 1450
nmcli con up eth0
VMよりbr0のMTUが小さいと大きいパケットが破棄されるため、
ホストからVMへのsshやVM-VM間のpingは成功するが、
VM-VM間のsshやpathtraceが失敗する。
(構成2) 仮想ネットワークの作成
仮想ネットワークbr0-vxlanとbr1-vxlanを作成。
cat <<EOF > /tmp/network-br0-vxlan.xml
<network>
  <name>br0-vxlan</name>
  <forward mode='bridge' />
  <bridge name="br0" />
</network>
EOF

virsh net-define /tmp/network-br0-vxlan.xml
virsh net-autostart br0-vxlan
virsh net-start br0-vxlan
cat <<EOF > /tmp/network-br1-vxlan.xml
<network>
  <name>br1-vxlan</name>
  <forward mode='bridge' />
  <bridge name="br1" />
</network>
EOF

virsh net-define /tmp/network-br1-vxlan.xml
virsh net-autostart br1-vxlan
virsh net-start br1-vxlan
不要なファイルの削除と状態確認。
rm /tmp/network-br{0,1}-vxlan.xml
virsh net-list
(構成2) DNS/DHCPサーバの設定 - Host#1
Rocky Linux 8の場合、必要なパッケージはlibvirtの依存関係でインストール済み。
CentOS 7の場合は追加でパッケージのインストールが必要。
yum install policycoreutils-python
Host#1のinternalゾーンでDHCPとDNSを許可する。
firewall-cmd --zone=internal --add-service dhcp
firewall-cmd --zone=internal --add-service dhcpv6
firewall-cmd --zone=internal --add-service dns
firewall-cmd --runtime-to-permanent
br0とbr1にIPv4のアドレスを設定。
nmcli con mod br0 ipv4.method static ip4 192.168.124.1/24
nmcli con up br0
nmcli con mod br1 ipv4.method static ip4 192.168.125.1/24
nmcli con up br1
br0とbr1で動くdnsmasqのサービスを作成。
semanage fcontext --add -t dnsmasq_lease_t '/var/lib/dnsmasq-vxlan/dhcp\.leasefile'
semanage fcontext --add -t dnsmasq_etc_t '/var/lib/dnsmasq-vxlan(/.*)?'
mkdir /var/lib/dnsmasq-vxlan

cat <<EOF > /var/lib/dnsmasq-vxlan/dnsmasq.conf
strict-order
pid-file=/var/run/dnsmasq-vxlan.pid
except-interface=lo
bind-dynamic
interface=br0
interface=br1
dhcp-range=tag:br0,192.168.124.16,192.168.124.254
dhcp-range=tag:br1,192.168.125.16,192.168.125.254
dhcp-no-override
dhcp-authoritative
dhcp-lease-max=253
dhcp-leasefile=/var/lib/dnsmasq-vxlan/dhcp.leasefile
dhcp-hostsfile=/var/lib/dnsmasq-vxlan/dhcp.hostsfile
dhcp-optsfile=/var/lib/dnsmasq-vxlan/dhcp.optsfile
addn-hosts=/var/lib/dnsmasq-vxlan/addn.hosts
EOF

touch /var/lib/dnsmasq-vxlan/dhcp.leasefile
touch /var/lib/dnsmasq-vxlan/dhcp.hostsfile
touch /var/lib/dnsmasq-vxlan/addn.hosts
touch /var/lib/dnsmasq-vxlan/dhcp.optsfile

restorecon -rv /var/lib/dnsmasq-vxlan

cat <<EOF > /etc/systemd/system/dnsmasq-vxlan.service
[Unit]
Description=DNS caching server for vxlan.
After=network.target

[Service]
ExecStart=/usr/sbin/dnsmasq -k --conf-file=/var/lib/dnsmasq-vxlan/dnsmasq.conf

[Install]
WantedBy=multi-user.target
EOF

systemctl enable dnsmasq-vxlan --now
systemctl status dnsmasq-vxlan
(構成2) 仮想ネットワーク間の通信 - Host#1
デフォルトでは仮想ネットワーク間(zone内のインタフェース間)の通信は遮断されている。
Rocky Linux 8以降はfirewall-cmd --zone=internal --add-forwardを実行すると、
仮想ネットワーク間(zone内のインタフェース間)で通信が疎通するようになる。
CentOS 7はzoneにforwardの設定がないため変更不可。
trustedゾーンは全ての通信を許可するため、forward設定に関わらず仮想ネットワーク間の通信も遮断されない。
そのため、CentOS 7で仮想ネットワーク間の通信を許可したい場合はinternalゾーンではなくtrustedゾーンを使うことで実現できる。
ゲストOSのインストール
VMが接続する仮想ネットワークを--network network=br0-vxlanで指定してインストールする。
複数の仮想ネットワークに接続する場合は--networkを複数指定する。
Rocky Linux 8以降ならゲストOSインストール時に仮想ネットワークに加えて仮想NICのMTUも指定可能。
仮想ネットワークのオプションにmtu.sizeを追加する(例: --network network=br0-vxlan,mtu.size=1450)。
virt-install --name centos7 --memory 2048 --vcpus 1 --disk size=8 --network network=br0-vxlan --os-variant centos7.0 --location /var/lib/libvirt/images/CentOS-7-x86_64-Minimal-2009.iso --nographics --extra-args='console=ttyS0,115200n8'
接続の確認
nmcli- DHCPの確認arping- ARPで疎通確認、同じL2セグメントなら成功するping- ICMPで疎通確認tracepath- tracerouteの代替、UDPで大きいパケットの疎通確認ssh- SSH接続、TCPで大きいパケットの疎通確認curl- HTTP
- VMからVM
- ホストからVM
- VMからホスト
- VMから外部